Michael J's build #2
-
Michael J
Re: Michael J's build #2
Yeah, i have to go out and buy some proper finishing materials. Or i could see what they have at my schools wood-shop, perhaps i can just do the work on my stock after school hours...
-
Michael J
Re: Michael J's build #2
https://www.dlaskarms.com/
Talked to the owner of this company over the phone, will pay them a visit next week. He want's to take a look at my m53 build, see if he wants to manufacture a few. Either way, in order to re-sell my gun, i need it "legitimately manufactured" , so this guy can help me do that too if he isnt interested in making more. Pretty much i finish it, and it says "manufactured by Dlask Arms" on the paperwork .
.
Would be nice to see some mg42's on the canadian market though, as of right now there are only 2 semi-auto's, and both of them are owned by John @ marstar ...
...
Talked to the owner of this company over the phone, will pay them a visit next week. He want's to take a look at my m53 build, see if he wants to manufacture a few. Either way, in order to re-sell my gun, i need it "legitimately manufactured" , so this guy can help me do that too if he isnt interested in making more. Pretty much i finish it, and it says "manufactured by Dlask Arms" on the paperwork
Would be nice to see some mg42's on the canadian market though, as of right now there are only 2 semi-auto's, and both of them are owned by John @ marstar
-
Michael J
Re: Michael J's build #2
update:
Visited Dlask Arms today, the owner Josef is a nice guy, unfortunately their company is just not big enough to take on something like the m53/mg42.
However he is willing to use some of his gov. contacts to get my gun approved upon my completion, so i am happy with that!
Visited Dlask Arms today, the owner Josef is a nice guy, unfortunately their company is just not big enough to take on something like the m53/mg42.
However he is willing to use some of his gov. contacts to get my gun approved upon my completion
-
Michael J
Re: Michael J's build #2
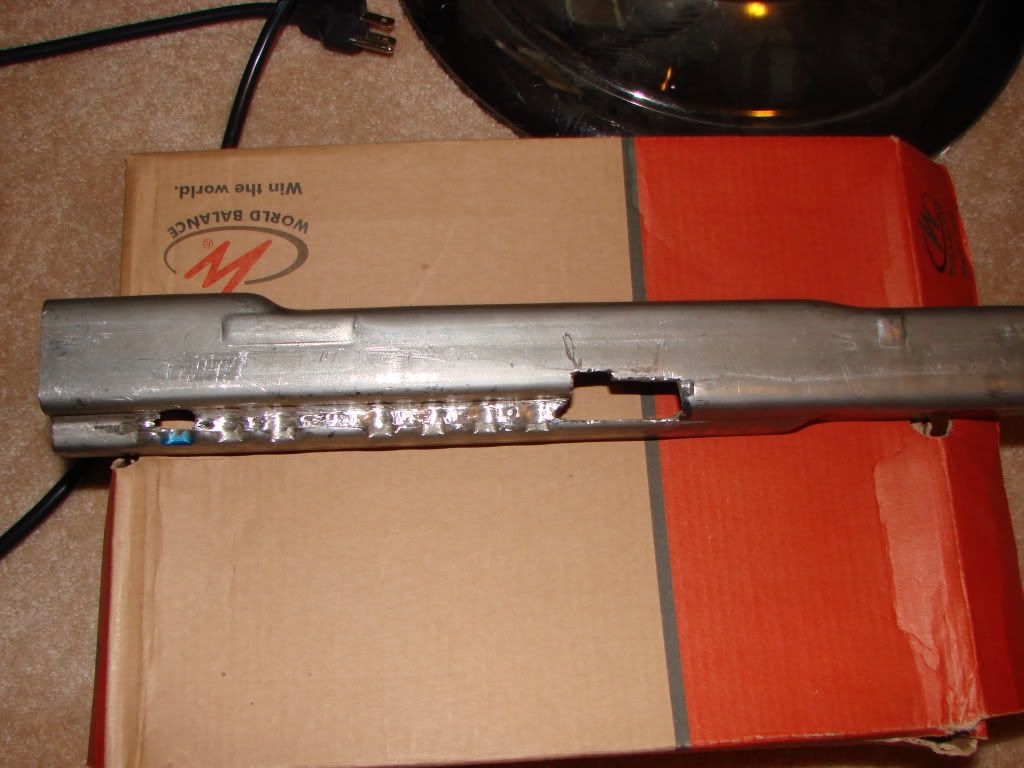
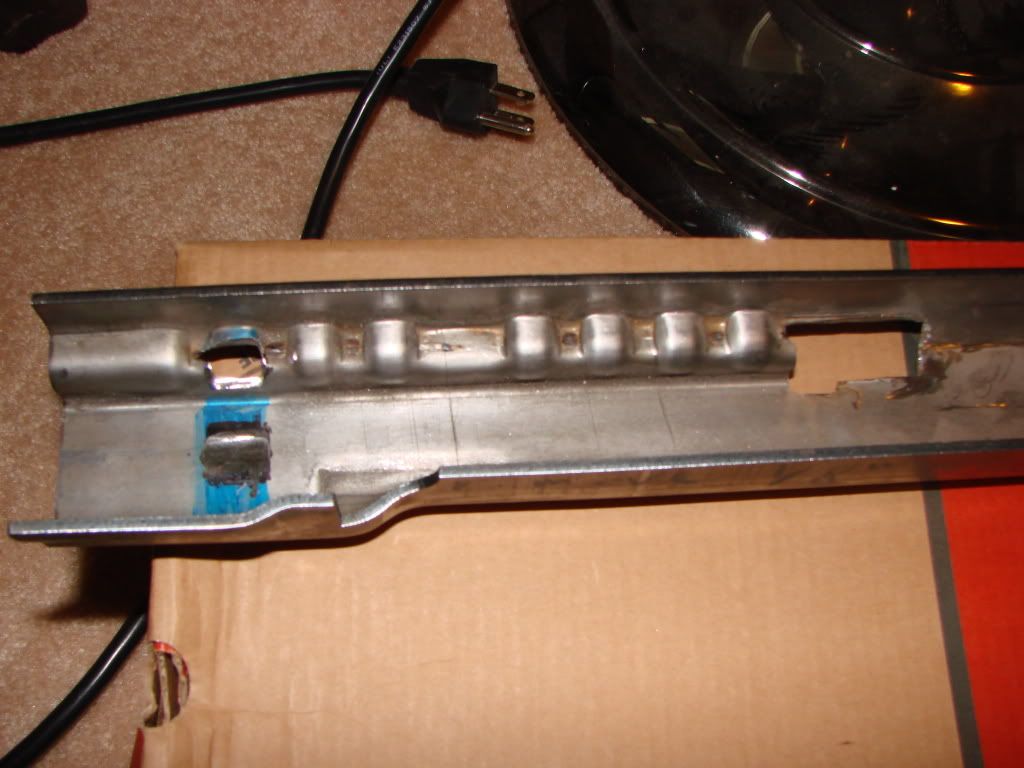
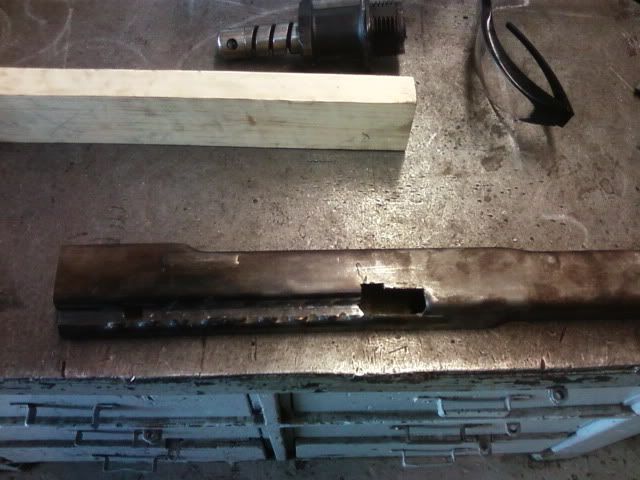
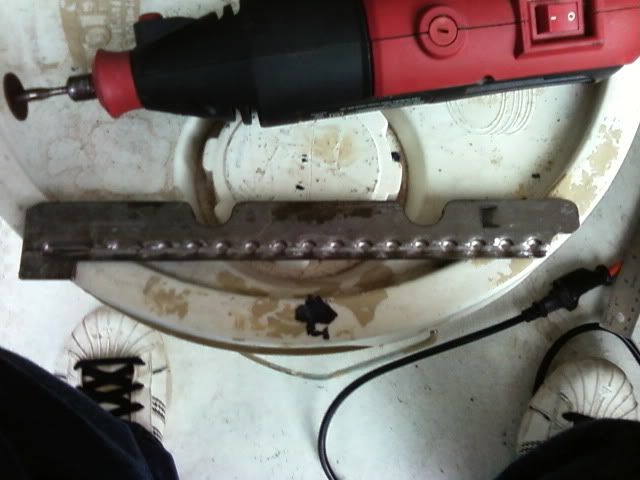
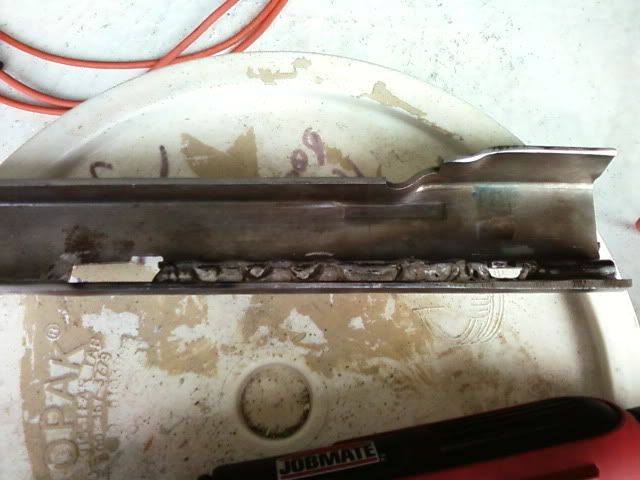
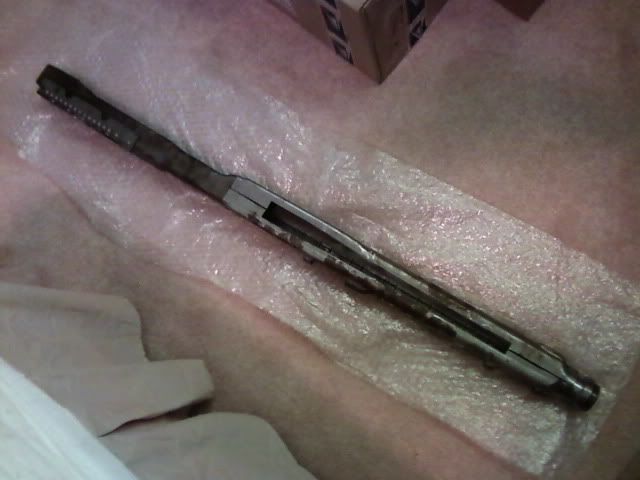
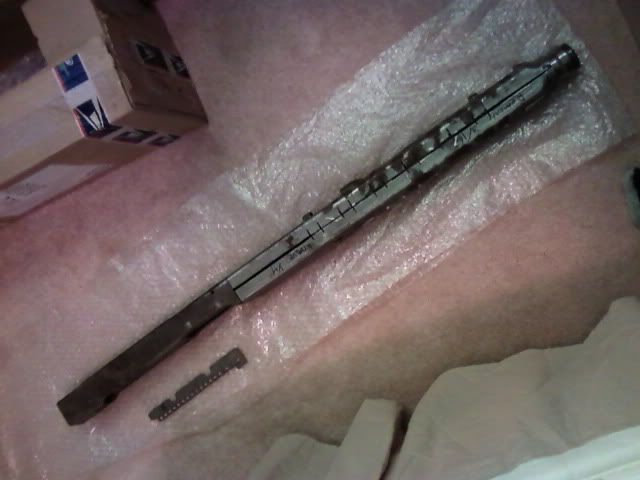
What i did all day, and with like 12 dremel 1" cutting disks 
 .
.
http://i175.photobucket.com/albums/w125 ... C03705.jpg
http://i175.photobucket.com/albums/w125 ... C03706.jpg
Now cutting that hole for the charging handle to go into wasn't too hard. With such tiny disks, it was time consuming if anything. BUT i could not for the life of me get the freaking charging handle to slide in! I went nuts on cutting the path for it, and as you can see in pic #2 i removed too much metal... I'm done for now, i cannot resume my work until september when i have access to the shop. Screw this stupid dremel, i'm using a milling machine *grumbles*...
So when i get back, i need to build up some metal with the MIG welder on those bumps, re-cut the pathway, and figure out why the heck my charging handle won't install. It's like it's too big, but i don't want to start removing metal from the charging handle until i figure out whats the problem, the stampings or me (i'm guessing me, lol)?
http://i175.photobucket.com/albums/w125 ... C03705.jpg
http://i175.photobucket.com/albums/w125 ... C03706.jpg
Now cutting that hole for the charging handle to go into wasn't too hard. With such tiny disks, it was time consuming if anything. BUT i could not for the life of me get the freaking charging handle to slide in! I went nuts on cutting the path for it, and as you can see in pic #2 i removed too much metal... I'm done for now, i cannot resume my work until september when i have access to the shop. Screw this stupid dremel, i'm using a milling machine
So when i get back, i need to build up some metal with the MIG welder on those bumps, re-cut the pathway, and figure out why the heck my charging handle won't install. It's like it's too big, but i don't want to start removing metal from the charging handle until i figure out whats the problem, the stampings or me (i'm guessing me, lol)?
-
12thWaffenSS
Re: Michael J's build #2
Good luck with all of that. You have much more patience that I ever would have had at your age or even now for that matter.Michael J wrote:What i did all day, and with like 12 dremel 1" cutting disks
http://i175.photobucket.com/albums/w125 ... C03705.jpg
http://i175.photobucket.com/albums/w125 ... C03706.jpg
Now cutting that hole for the charging handle to go into wasn't too hard. With such tiny disks, it was time consuming if anything. BUT i could not for the life of me get the freaking charging handle to slide in! I went nuts on cutting the path for it, and as you can see in pic #2 i removed too much metal... I'm done for now, i cannot resume my work until september when i have access to the shop. Screw this stupid dremel, i'm using a milling machine
So when i get back, i need to build up some metal with the MIG welder on those bumps, re-cut the pathway, and figure out why the heck my charging handle won't install. It's like it's too big, but i don't want to start removing metal from the charging handle until i figure out whats the problem, the stampings or me (i'm guessing me, lol)?
-
flemgunner

- Brigadegeneral

- Posts: 635
- Joined: Sat Apr 21, 2007 6:35 am
- Location: Texas
- Contact:
Re: Michael J's build #2
Looks good so far.
I had to grind off some of the charging handle slide to get it to fit in there properly.
I had to grind off some of the charging handle slide to get it to fit in there properly.
-
DARIVS ARCHITECTVS

- Field Marshal

- Posts: 2452
- Joined: Wed Aug 31, 2005 12:24 am
- Anti-spam: Mg42
- Location: Minnesota
Re: Michael J's build #2
+112thWaffenSS wrote:I would suggest using Linseed Oil on the stock.
Using mink oil will not oxidize and darken the wood to bring out the rich finish. Boiler linseed oil is the ticket. So use a degreasing agent (gun scrubber or water and dish washing liquid) to remove the mink oil and then apply linseed oil, the oil originally used on military rifle stocks since long before WWII. If you feel the need to pimp it out and make it shiny, apply REAL tung oil (not the product with the same name that is a VARNISH! - read the ingredients!). Of course, making a shiney surface on a dented, scratched, and beat stock looks REALLY fake and amateurish. A satin finish is required. So, the formula is linseed oil (4-5 coats over three weeks) followed by carnuba wax to seal the pores (Minwax will do, but it's not as good. Carnuba wax makes a harder finish). If you have a 1970's can of paste Johnson wax on hand like I do, that also is superior to Minwax.
DARIVS ARCHITECTVS
Knight's Armoury
Knight's Armoury
-
Michael J
Re: Michael J's build #2
Thanks you guys
I'll be sure to grind down the handle after i re-machine out the pathway. And i'm going to re-re-finish the stock properly DA, or perhaps buy a nice new one because mine has two nasty cracks in it, that it came with.
I'll be sure to grind down the handle after i re-machine out the pathway. And i'm going to re-re-finish the stock properly DA, or perhaps buy a nice new one because mine has two nasty cracks in it, that it came with
-
Michael J
Re: Michael J's build #2
Well after totally destroying the charging handle slot on my rear stamping, i spent some pain-staking time restoring it  . Not as pretty as the original, but who cares about the bumps on the inside! I'll get pics up this weekend when i take it home. Now that i have repaired it, i can FINALLY start making real progress like getting the dumb thing welded up, and start machining junk!
-
rocco1911
Re: Michael J's build #2
Well thats good news keep at it Mike we are all eagerly waiting to see how it all comes together.... 
-
42rocker
- Administrator

- Posts: 3329
- Joined: Fri Jan 11, 2008 6:03 pm
- Anti-spam: Mg42
- Location: Florida
Re: Michael J's build #2
Glad to see that your back at it.
GOOD LUCK!!!
I still need to start one... LOL
Later 42rocker
GOOD LUCK!!!
I still need to start one... LOL
Later 42rocker
-
Michael J
Re: Michael J's build #2
Thanks guys .
Well, as i have access to the shop approximately every 2nd day for about an hour and 20 minutes, i do not expect to be finished too soon! It actually alternates every 2nd week. One week i get 2 classes , then the next i get 3 ... So minimal time to get work done this semester . Next semester i will have time every day, but i want to try and get it finished ASAP ,as gov't approval will take a few months to complete , and i need this thing sold to fund university (well, scholarships should do that , i need this thing to fund my 69 mach 1 )!
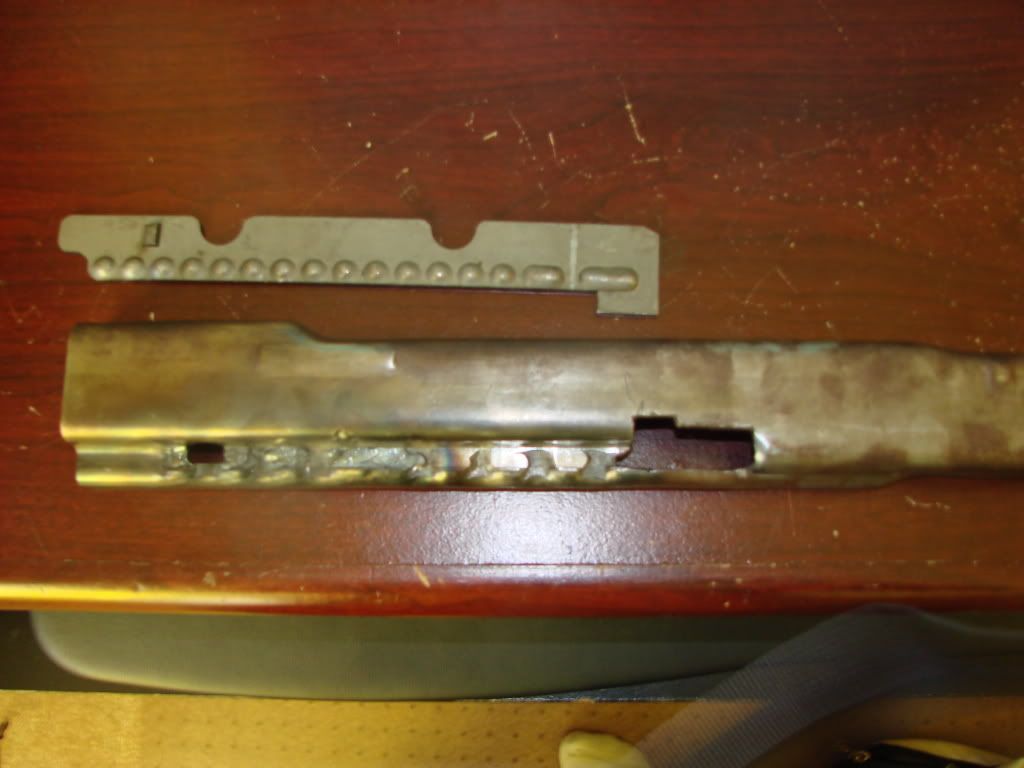
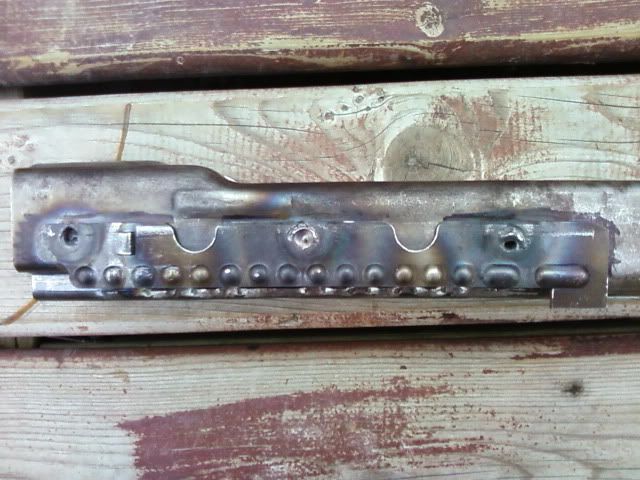
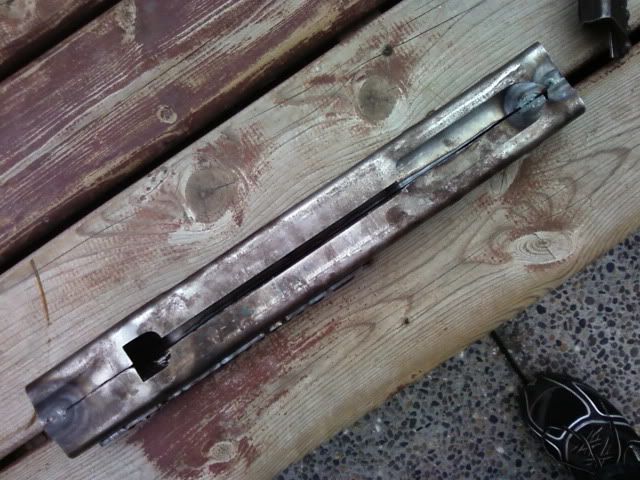
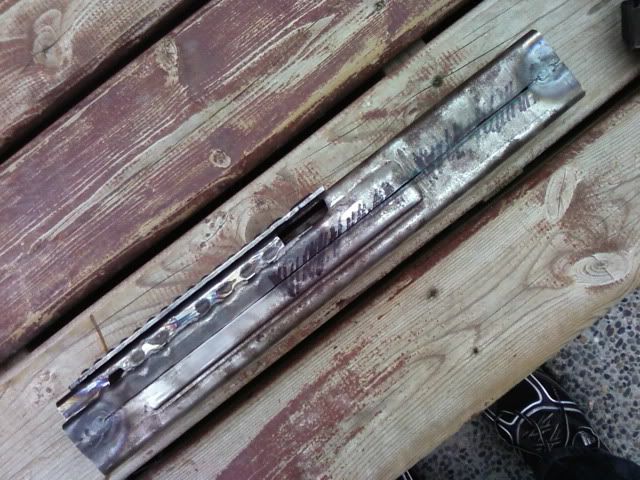
Anyways, no chance to work on her today , but here is my repair job. By the way, slot cutting on the horizontal milling machine = SUPER SLOW. Oh my goodness, i think it was just because the metal i welded on was pretty hardened. Pretty much, i welded some metal onto the large holes where bumps used to be on the outside, then milled a nice slot into it. After having done that, it was flat enough to place a piece of coper in there, the approximate width of the slot. From there , i then welded the holes from the inside. After building up that weld, i used the vertical milling machine to reshape my bumps into what you see now. I have to weld up a tiny bit more, but aside from that, i will be taking my dremel and grinding the inside into nice smooth bumps as on the original.
THIS IS WHAT HAPPENS WHEN YOU MESS UP, DON'T DO IT, LOTS OF REPAIR WORK! ...
Or i could have just been patient, waited until now to use the horizontal milling machine to do the slot in the first place, and not butchered it with a dremel!
http://i175.photobucket.com/albums/w125 ... C03871.jpg
http://i175.photobucket.com/albums/w125 ... C03873.jpg
Once i get the cosmetics all done with, i'll fix up the slot with one more pass on the horiz. mill. machine.
Well, as i have access to the shop approximately every 2nd day for about an hour and 20 minutes, i do not expect to be finished too soon! It actually alternates every 2nd week. One week i get 2 classes , then the next i get 3 ... So minimal time to get work done this semester
Anyways, no chance to work on her today , but here is my repair job. By the way, slot cutting on the horizontal milling machine = SUPER SLOW. Oh my goodness, i think it was just because the metal i welded on was pretty hardened. Pretty much, i welded some metal onto the large holes where bumps used to be on the outside, then milled a nice slot into it. After having done that, it was flat enough to place a piece of coper in there, the approximate width of the slot. From there , i then welded the holes from the inside. After building up that weld, i used the vertical milling machine to reshape my bumps into what you see now. I have to weld up a tiny bit more, but aside from that, i will be taking my dremel and grinding the inside into nice smooth bumps as on the original.
THIS IS WHAT HAPPENS WHEN YOU MESS UP, DON'T DO IT, LOTS OF REPAIR WORK!
Or i could have just been patient, waited until now to use the horizontal milling machine to do the slot in the first place, and not butchered it with a dremel!
http://i175.photobucket.com/albums/w125 ... C03871.jpg
http://i175.photobucket.com/albums/w125 ... C03873.jpg
Once i get the cosmetics all done with, i'll fix up the slot with one more pass on the horiz. mill. machine.
-
Michael J
Re: Michael J's build #2
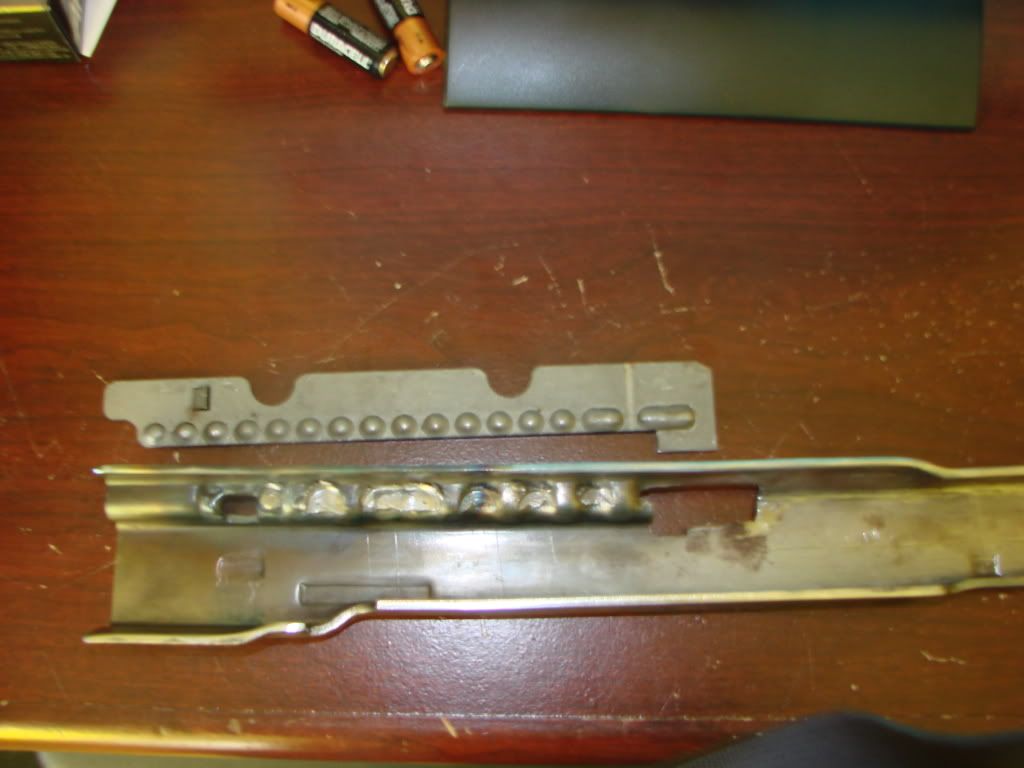
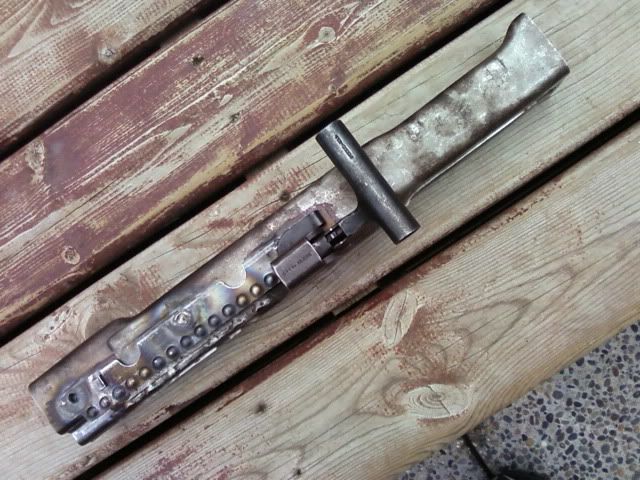
Milled out slot for charging handle , fits perfect! Now to attach the ratchet plate (and dremel out the slot in it)
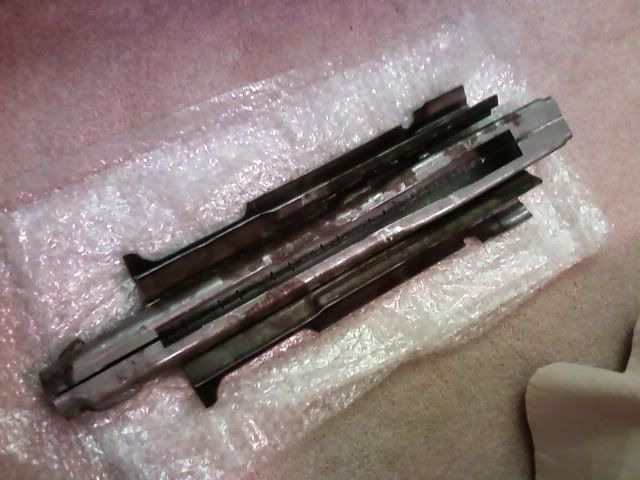
Cut the extra metal off for barrel bushing
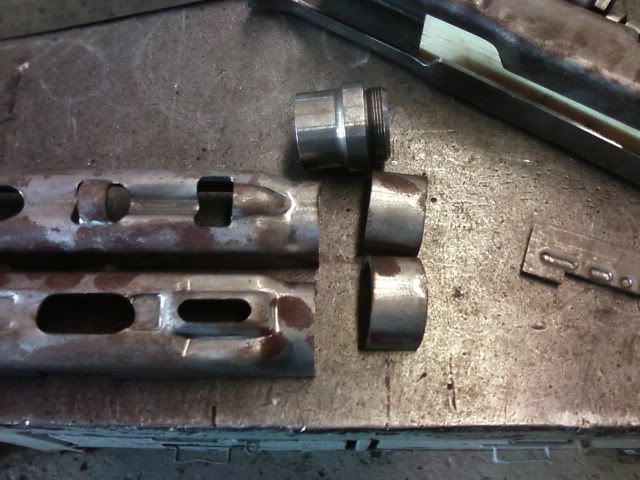
Peice of wood holds the 2 peices correct distance from eachother. I had to carefully beltsand the stampings to correct width as they came out of spec. Nearly ready to be welded, just need to clean up the inside with my dremel and a sanding bit.

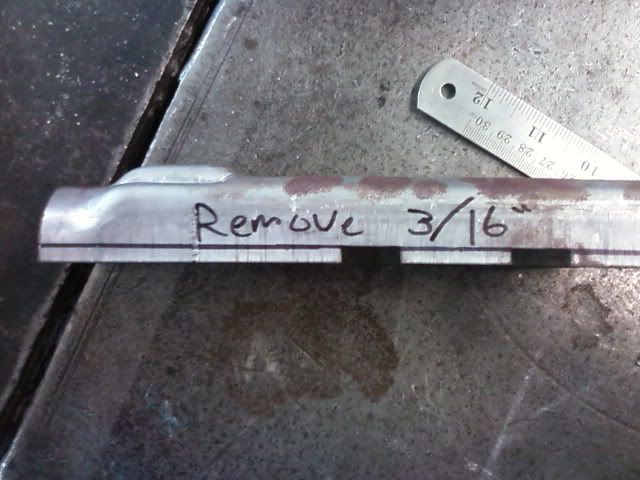
The front of the stampings require the removal of 3/16" metal from each side.
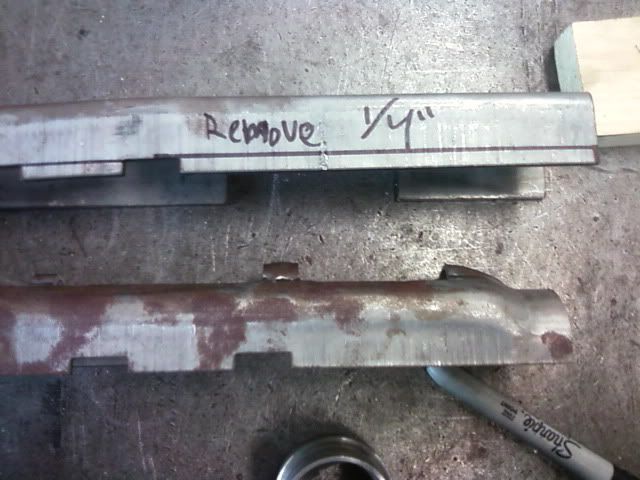
However the rear requires 1/4" metal removed from each side...
I secretly think that BRP should try to cut their stampings to correct size , as it was a LOT of work to get the rear all nice and fit, let alone the front end which is near twice as long!
Anyways, my progress report !
Cut the extra metal off for barrel bushing
Peice of wood holds the 2 peices correct distance from eachother. I had to carefully beltsand the stampings to correct width as they came out of spec. Nearly ready to be welded, just need to clean up the inside with my dremel and a sanding bit.
The front of the stampings require the removal of 3/16" metal from each side.
However the rear requires 1/4" metal removed from each side...
I secretly think that BRP should try to cut their stampings to correct size
Anyways, my progress report
-
pathfinder
- Unteroffizier

- Posts: 46
- Joined: Sun Jan 06, 2008 11:49 pm
Re: Michael J's build #2
Mike, looking good so far! Make sure that your barrel bushing has the semi-circular cut-out on the right hand side for barrel removal. It would be very hard to do after welding it in. {It allows the barrel to swing to the right to allow for removal and replacement}. I almost found out the hard way.
-
Michael J
Re: Michael J's build #2
I actually forgot about that until i was fiddling around with it! , that would be a HUGE pain in the butt to repair!
-
Michael J
Re: Michael J's build #2
Some barrel shroud questions!
Need some measurement values regarding those little slots pictured.
1) Their height
2) Length excluding radius (the straight part before the half circle)
3) Length including radius
I think their height is like 3/8" , and i think i got their length excluding radius too, but i wish to double check my values. only thing i don't know is how deep i should go with the radius, i'm guessing to 1/2 the diameter of the milling machine bit used deep (half circle).
Anyways, thanks guys for advice! I know most of u guys just use original front shrouds, but i don't got that luxury over here , and it is a PAIN in the BUTT to do! Also, if anyone has a good picture of the barrel shroud/ camming area on the barrel door side ,i'd super appreciate it!
Need some measurement values regarding those little slots pictured.
1) Their height
2) Length excluding radius (the straight part before the half circle)
3) Length including radius
I think their height is like 3/8" , and i think i got their length excluding radius too, but i wish to double check my values. only thing i don't know is how deep i should go with the radius, i'm guessing to 1/2 the diameter of the milling machine bit used deep (half circle).
Anyways, thanks guys for advice! I know most of u guys just use original front shrouds, but i don't got that luxury over here
- Attachments
-
-
Michael J
Re: Michael J's build #2
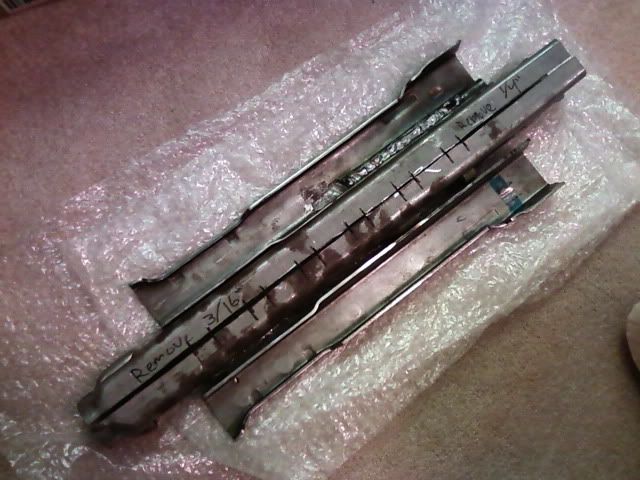
Progress.... Well the BRP stampings aren't the quality i had hoped for, perhaps i just got some bad ones :/ ... They were stamped somewhat twisted, so when i removed an even amount of metal from each side, they still did not line up nicely. However, this just means i will have to fill some gaps while welding, not a huge issue, just inconvenience.
But what can i say, aside from the small twisting, they got a GOOD product , and working with these is a heck of a lot easier than making them from scratch. So what can i say, we still love ya BRP .
Here we are, excess metal cut off, and ready for welding! Needless to say, i got a tonne of machine work / cutting to do though even after it is welded. I marked the areas that i will be cutting those oval slots into with small cuts too, so that they are still there after it is welded. I figured sharpie would evaporate while TIG welding it!
Pretty much i cut all the tabs off, however this still leaves more to be removed, but atleast it is taking shape, and i am (excuse my language) freaking excited .
Ratchet plate slot cut, all fits good.
Repair work done to my bumps after the dremel massacred em
the stampings:
I mocked it all up with the bushing too:
But what can i say, aside from the small twisting, they got a GOOD product
Here we are, excess metal cut off, and ready for welding! Needless to say, i got a tonne of machine work / cutting to do though even after it is welded
Pretty much i cut all the tabs off, however this still leaves more to be removed, but atleast it is taking shape, and i am (excuse my language) freaking excited
Ratchet plate slot cut, all fits good.
Repair work done to my bumps after the dremel massacred em
the stampings:
I mocked it all up with the bushing too:
-
Michael J
Re: Michael J's build #2
Drilled 3 holes into the ratchet plate today, then welded em in place with tacks. I will fill the holes later on, it holds good for now anyways, and the charging handle slides back and forth all good!
Tacked the rear together too, all lines up good, so i shall finish welding it up asap, along with getting some of the internal thingy's put into it (buffer tabs and blocking bar). I tested rail fit... perfect!
I'm glad it is all going as planned so far anyways! The wood i was using to space out my parts sort of combusted though .
Tacked the rear together too, all lines up good, so i shall finish welding it up asap, along with getting some of the internal thingy's put into it (buffer tabs and blocking bar). I tested rail fit... perfect
I'm glad it is all going as planned so far anyways! The wood i was using to space out my parts sort of combusted though
-
flemgunner
- Brigadegeneral
- Posts: 635
- Joined: Sat Apr 21, 2007 6:35 am
- Location: Texas
- Contact:
Re: Michael J's build #2
Thats looking great man. Im really impressed with what ya got there.